Getting Started
Requirements
First, open a terminal in your home directory and check that you have everything you need by running these commands:
python3 --version
pip3.4 --version
virutalenv --version
git --version
If those four commands don’t return anything, then follow the requirement links at the top before continuing. Once all the commands return a valid version, we are ready to move on to System Setup.
- For Windows
Run the above commands in a Git Bash Terminal. To access this, make sure you select “Git Bash Here” when installing git. Then go to any folder and
right click->Git Bash HereBefore running the commands, you’ll need to follow the directions for Windows listed below. Also, be sure to pay attention to the For Windows notes throughout the tutorial.Sometimes the windows installation can be a pain. For help see (https://docs.python.org/3.4/using/windows.html). In the simplest case, you’ll have to do the following:
Install Python3.4 for Windows from the link above
- Go to
Control Panel->System->Advanced System Settings->Environment Variables - In
System variablesselectPathand hitEdit - Append (do not delete any text that exists) the following text at the end of the line:
;C:\Python34;C:\Python34\Scripts; - hit
OKuntil out of all configuration windows
- In
- Go to
- Create a
python3shortcut to work with the rest of this tutorial You may be able to skip this and just use
pythoninstead ofpython3for the rest of this tutorial
- Create a
Open
cmdin Administrator Mode (Windows Key-> locatecommand prompt-> right clickcommand prompt->Run as Administratortype:
cd C:\Python34type:
mklink python3.exe python.exe
Pro Tip: After modifying anything in the system (such as all the actions from the above section), you’ll need to close and re-open your git bash window to see your changes reflected. Simply close the window, right click, and select “git bash here” once more.
Congratulations, Windows users! Now you can verify your requirements are met by running the 4 commands at the top of the page.
System Setup
Each nio project will be in its own directory. We will start by creating some directories for these:
cd ~
mkdir nio
cd nio
mkdir projects
mkdir versions
Global Installation (no virtual environment)
Let’s start by installing nio version 1.5.3 globally (without the use of a python virtual environment). In most cases, this is the method you will want to use. If you’re installing n.io onto a device where you’ll need the ability to switch between different versions for development/testing purposes, you may want to skip ahead to the intructions for installing with a virtual environment, but for almost all other cases, a global install is the way to go.
First we need to make sure our user has the proper permissions to install python packages via pip. This is done by adding our user to a group that has write permissions to /usr/local/lib/python3.4/site-packages. This group is usually staff on most linux distributions. The command to do this on linux would be:
sudo usermod -a -G staff <USERNAME>
And on OSX:
sudo dseditgroup -o edit -a <USERNAME> -t user staff
Now we need to get the wheels for nio and nioext onto the device which n.io will be installed to. Once the wheels are on the device, navigate to the directory they have been copied to, and install them with these commands:
sudo pip3.4 install nio-1.5.3-py3-none-any.whl
sudo pip3.4 install nioext-1.5.3-py3-none-any.whl
**Note: Depending on how pip was installed, the command may be slightly different. You can verify the command to call pip by trying pip, pip3, or pip3.4 with the --version option. Also, if you have access to the web hosted nio wheels, you can just use sudo pip3.4 install http://<URL-of-nio-wheels> and skip copying them locally to the device.
If you need to install using a virtual environment or you are using windows, follow along in the section below. If you’re NOT installing to a virtual environment or using windows, we can now move on to Installing nio CLI.
Virtual Environment Installation
This section will guide you as to how n.io is installed contained within a python virtual environment. This keeps n.io and all it’s dependencies isolated, and can be useful when you need the ability to switch between different versions of n.io, such as in a development or testing environment. You can read more about virtual environments here.
cd ~/nio/versions
virtualenv -p python3 1.5.3
- For Windows
- The previous command will be:
virtualenv -p C:/Python34/python.exe 1.5.3
You now need to activate your virtual environment. This will add a (1.5.3) to the beginning of your command line to indicate the virtual environment that you are using.
source 1.5.3/bin/activate
- For Windows
- The previous command will be:
source 1.5.3/Scripts/activate
When you’re done using nio, you can leave the virtual environment with deactivate. When using nio again, be sure to activate the virtual environment first with source ~/nio/versions/1.5.3/bin/activate.
OK, now we can install nio. If you don’t have these wheels then you’ve got to make friends with someone who does!
pip install nio-1.5.1-py3-none-any.whl
pip install nioext-1.5.1-py3-none-any.whl
- For Windows
pywin32 must also be installed:
easy_install http://sourceforge.net/projects/pywin32/files/pywin32/Build%20219/pywin32-219.win-amd64-py3.4.exe/downloadNote: make sure you take note of the “bittedness” of your python installation. The link above provides the command to install pywin32 on a system running 64-bit python. If you are running 32-bit python, the command will be:
easy_install http://sourceforge.net/projects/pywin32/files/pywin32/Build%20219/pywin32-219.win32-py3.4.exe/download
The installation of nio is now complete! You can run the instance from a project directory with the run_nio command. See Setting up a NIO Project for instructions on creating a project directory.
Installing nio CLI
We now install the nio CLI, a tool that takes care of common operations like creating projects, adding blocks, managing dependencies, and running n.io itself. It is called the nio Command Line Interface (CLI).
pip install nio-cli
Setting up a NIO Project
To use the nio CLI you need git (a distributed version control tool) and a GitHub account with ssh access.
After getting your github account set up and adding your ssh key to it (click the links above if you need help with this), verify that you can connect to git with: ssh -T git@github.com. It should return something like “Hi <YOUR_USER_NAME>! You’ve successfully authenticated, but GitHub does not provide shell access.”
If you have having trouble connecing, type this and then try again: eval $(ssh-agent -s) && ssh-add ~/.ssh/id_rsa
To help you get started, we provide a project template which reflects the standard directory structure of a nio project. Use the nio CLI to create a new project from the template:
cd ~/nio/projects
nio new <project_name>
cd <project_name>
If you don’t have ssh access set up for GitHub then try using the https flags:
nio new <project_name> --https
The first thing we’re going to need is some blocks. We provide a selection of open source blocks <https://github.com/nio-blocks> for your convenience, but, remember, nio is designed to make it easy for you to develop custom blocks; more on this later. For now, let’s just get a group of blocks that we’ve categorized as util.
nio add util
Again, if you don’t have ssh access set up for GitHub then try using the https flags:
nio add util --https
Running nio
This part is simple. Navigate to your project directory (which you should still be in if you’ve been following along), and run the following command. If you’ve installed n.io to a virtual environment, make sure it’s active!
cd ~/nio/projects/<project_name>
nio server
If you see any ERROR messages you may have a problem. But for now lets ignore this one: NIO [ERROR] [Discover] Failure loading module nioext.components.snmp.agent ImportError:No module named 'pysnmp'. We won’t be using that anyway.
The previous command runs n.io with standard output to the console. This is excellent to ensure that your instance is running properly and troubleshoot dependency issues, but for the most part, you’ll want n.io running in the background. This is achieved by adding the -bg flag to the nio server command, like so:
nio server -bg
This method will simply return you to a command prompt, with no console message output, and will keep running until the instance is terminated with nio co shutdown.
At this point we’re done running commands from the terminal, but we will be keeping an eye on these logs.
(Later, when you’re done, you’ll want to press ctrl-c to exit nio).
Creating your first service
nio has a web app that you can use to interact with a running nio instance. By default, the project_template runs on 127.0.0.1:8181, so just visit <http://builder.n.io> and log in with the default administrator priviledges (username: Admin; password: Admin). You should see something like this:
open http://builder.n.io
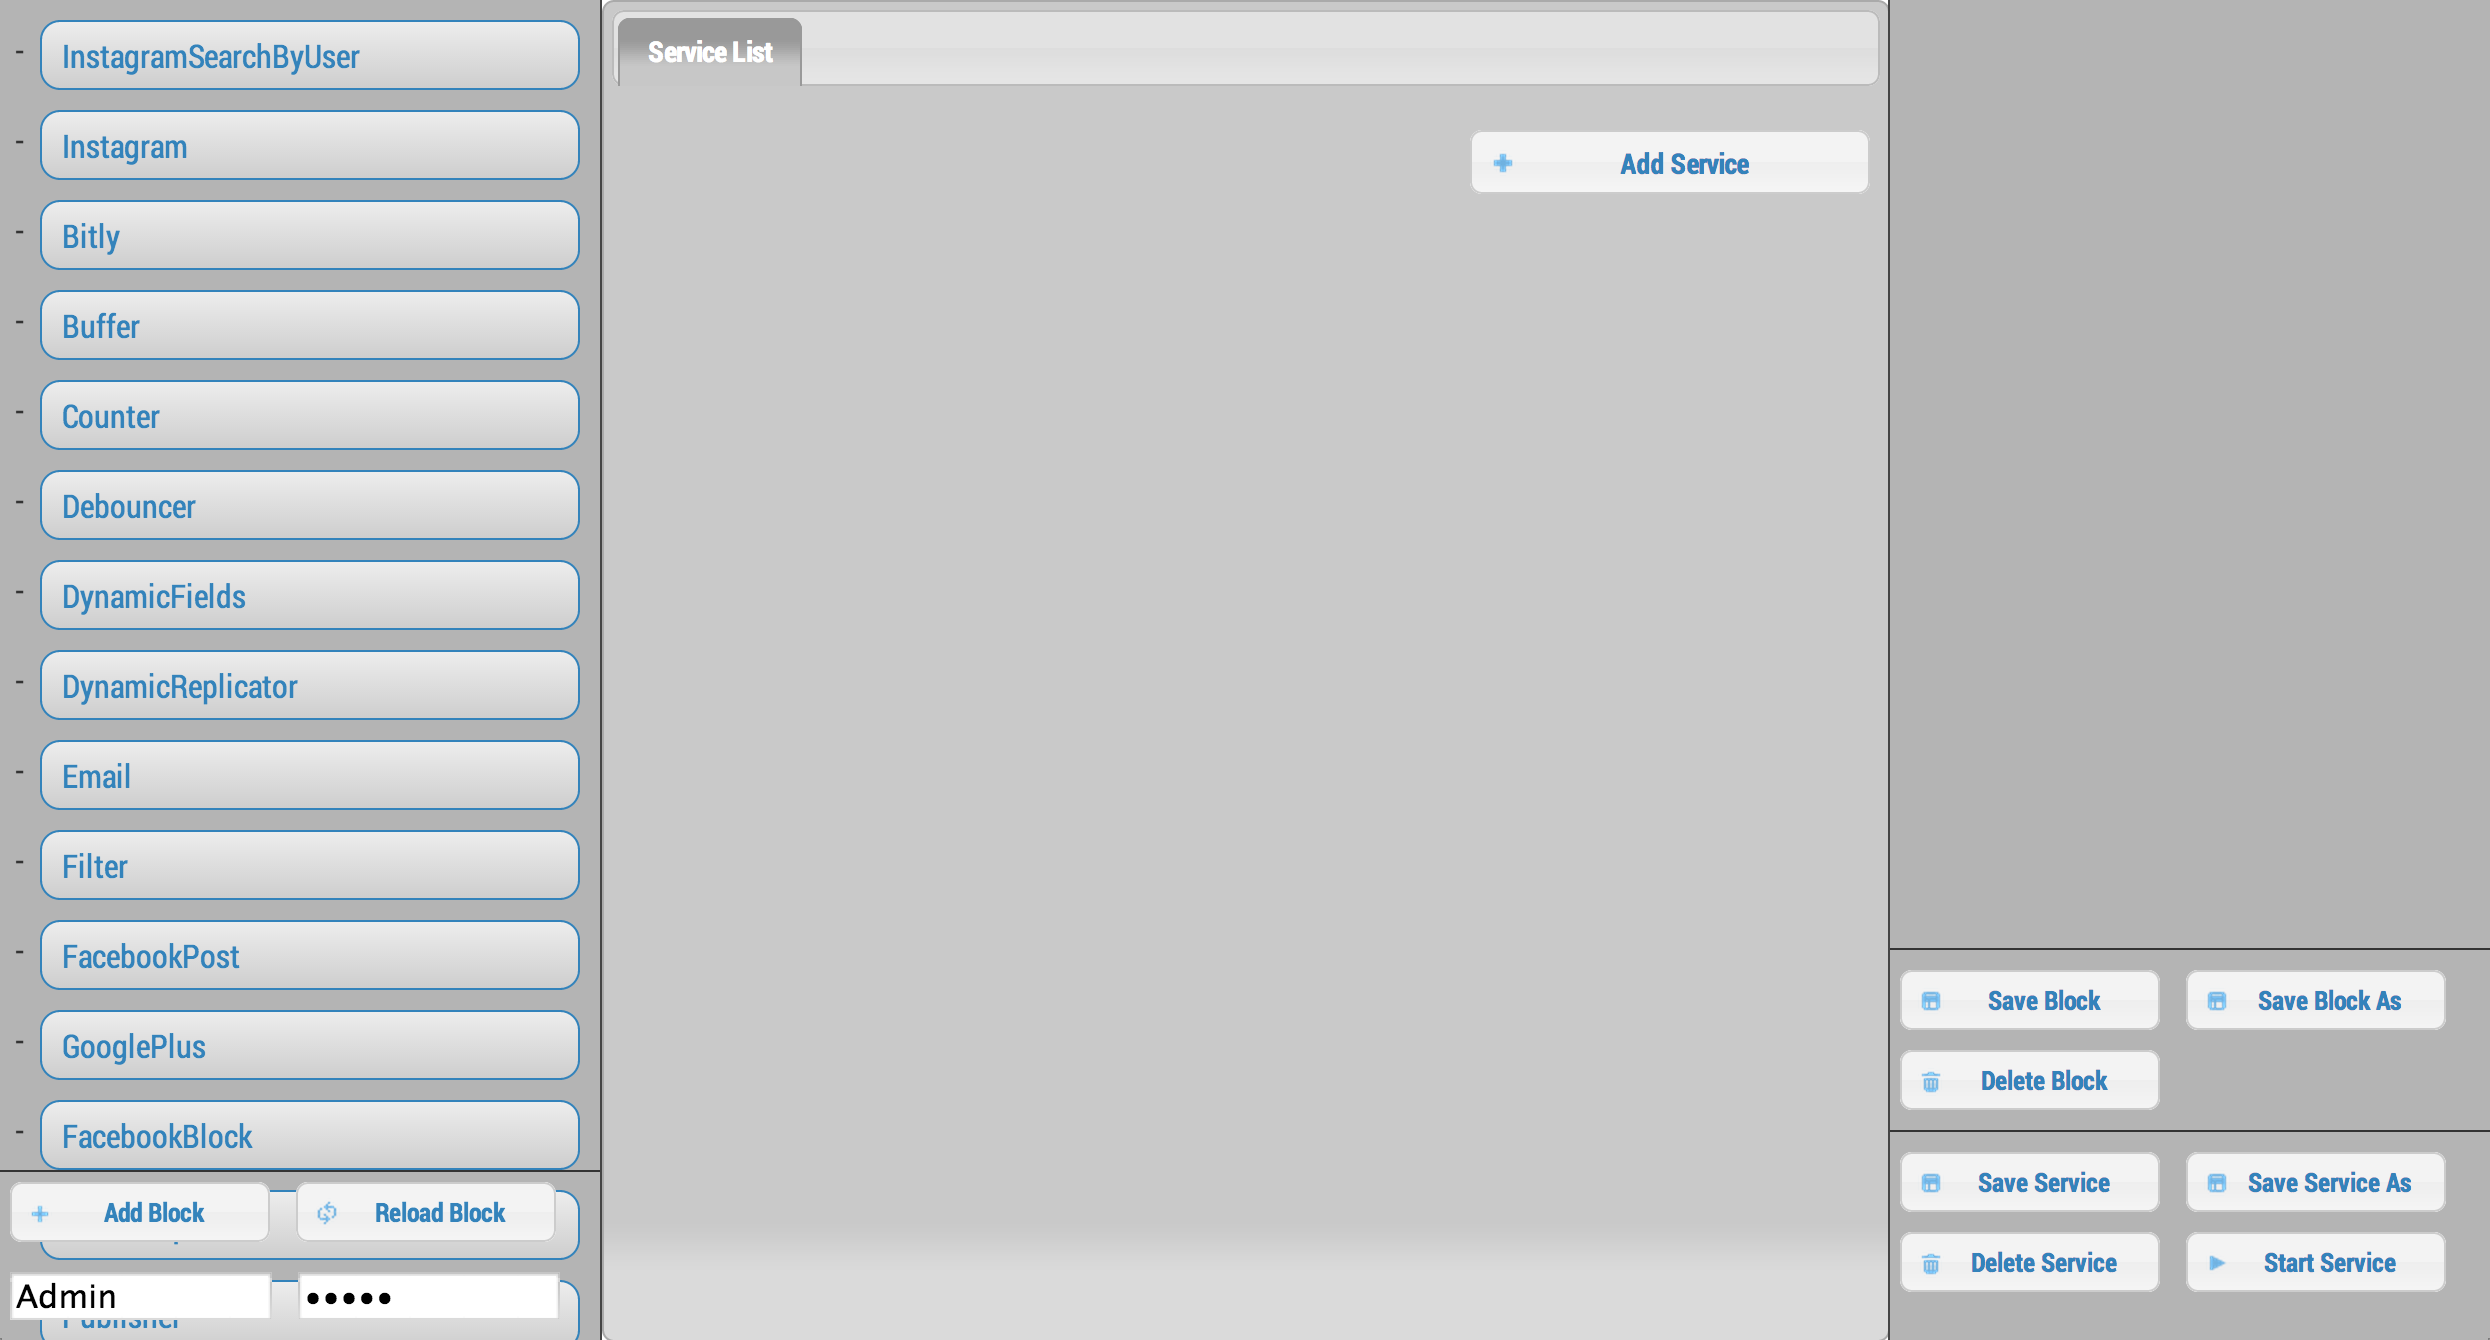
To demonstrate the most basic use of the web UI, we’ll design a service that generates nio signals automatically and logs them to the nio logging. With the way the project template is configured, this means we will see the simulated signals logged to the console and to a log file for our service.
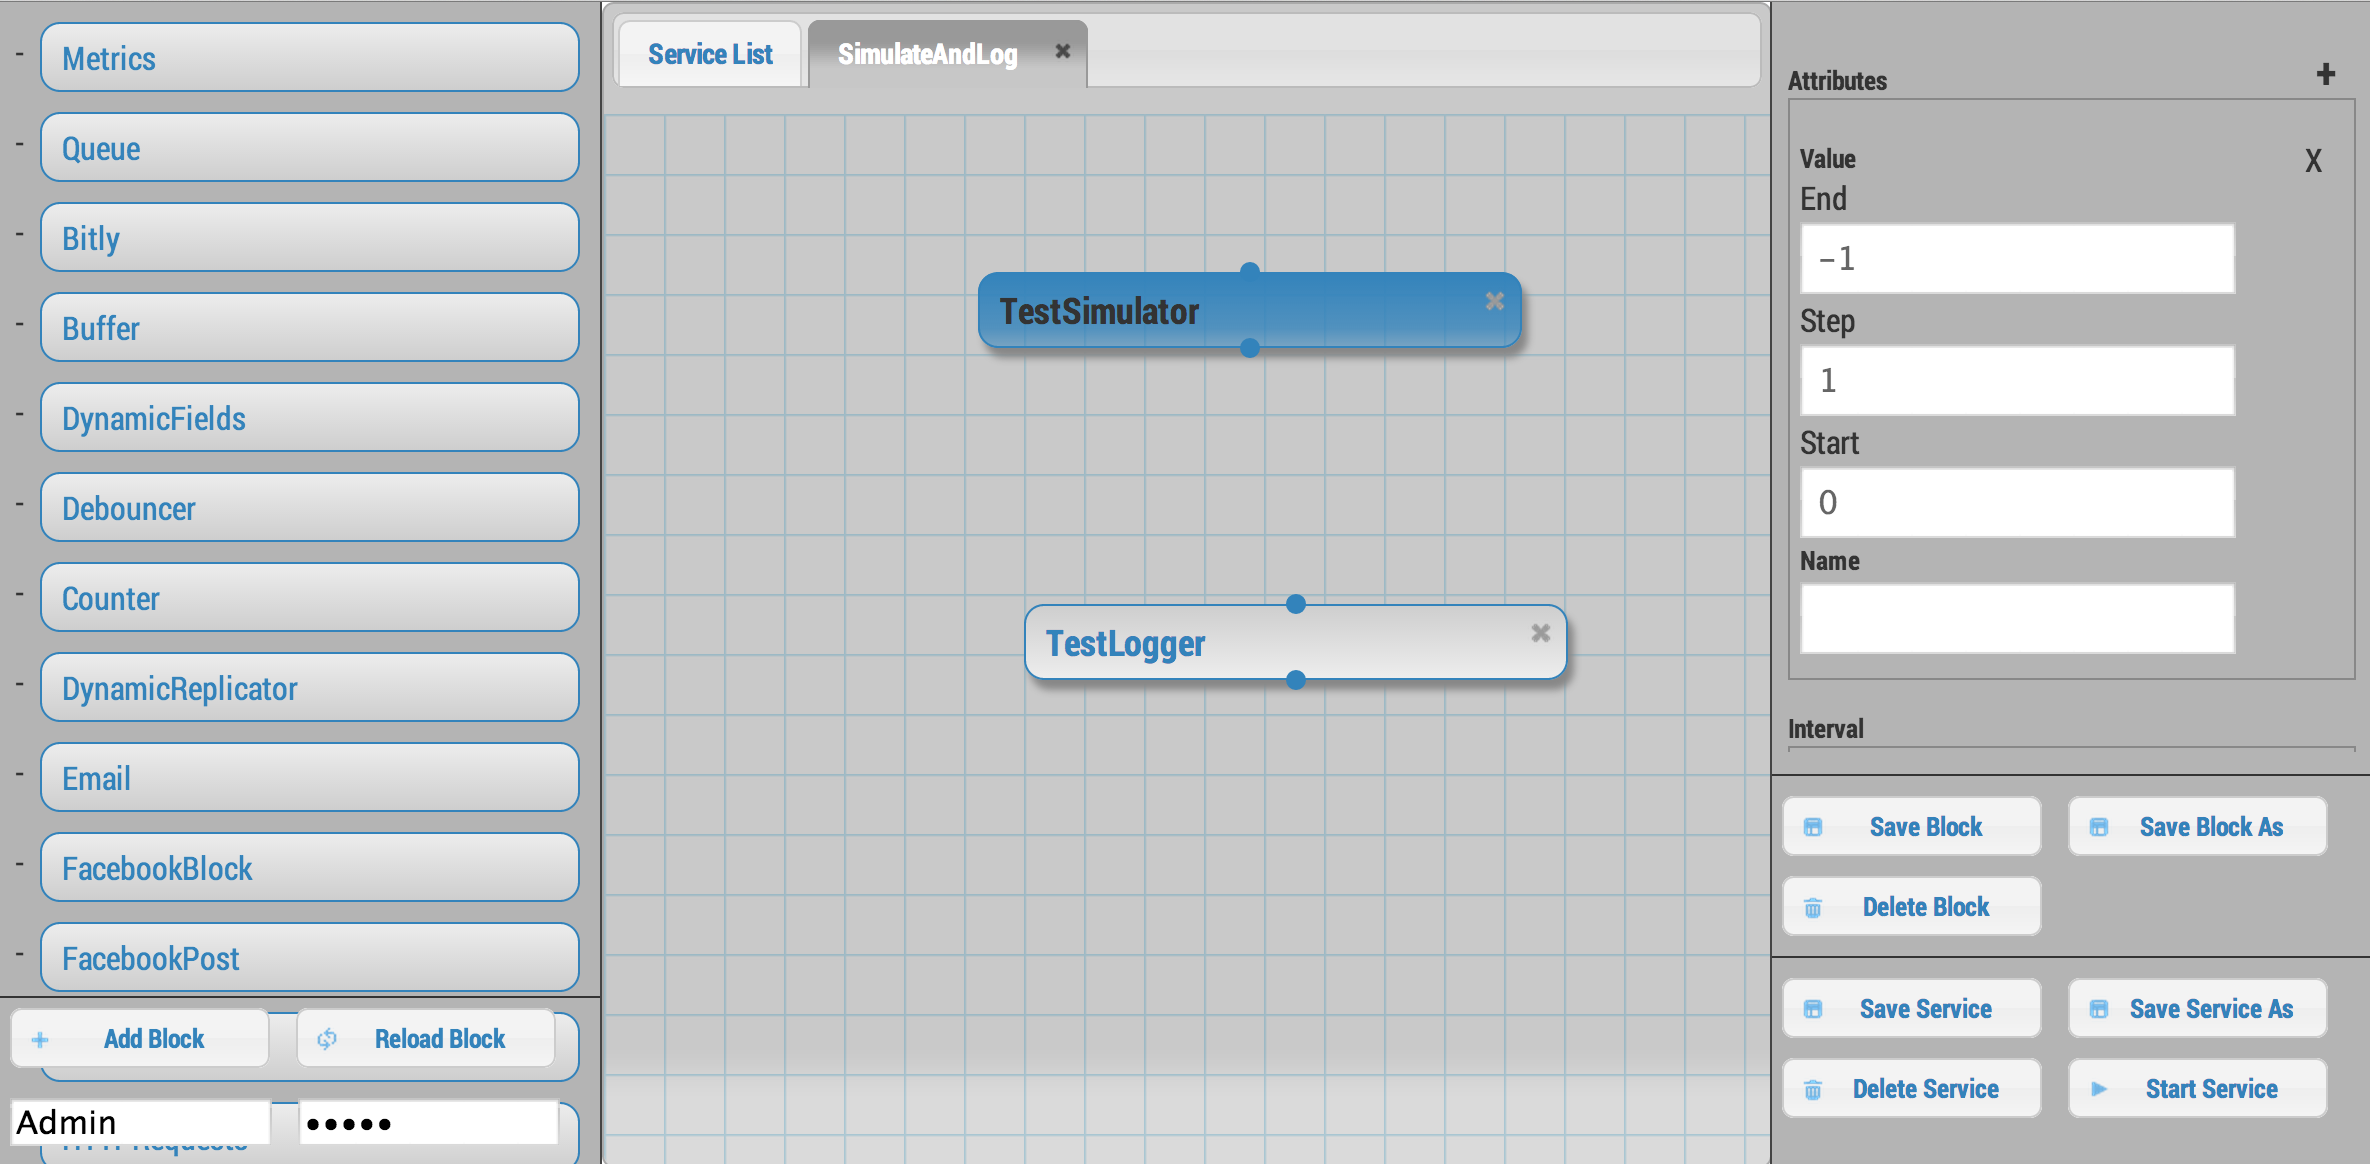
First, click the Add Service button that appears in the top-right corner of the center panel of the web UI. Let’s name the service SimulateAndLog. When you’re done entering the service name, click Submit. At this point, your browser window should look something like this:

Now we can add a few blocks. The list in the left panel of the UI contains the list of block types currently loaded into nio. Scroll until you find the Simulator; click and drag it over to the SimulateAndLog grid. Name it TestSimulator and click Submit. In the left panel, again, scroll to find the LoggerBlock, and drag it over to the grid. Name it TestLogger.
Click Save Service in the bottom right of the right panel (you should get a confirmation that the save was successful).
Click the Start Service button in the very bottom right of the UI, and watch the terminal where you executed run_nio.
You should see a bunch of log messages with information about starting and configuring the service, but no signals get logged! This is because we didn’t connect the blocks in SimulateAndLog. Nio blocks can run in isolation until the cows come home, but they won’t communicate with each other until we explicitly connect them. Lets fix that.
First, stop the service (changes to a running service won’t be reflected in its behavior until it is restarted anyway). Next, connect TestSimulator to TestLogger. Click and drag from the dot on the underside of TestSimulator to the dot on top of TestLogger.

Click Save Service and Start Service again. This time you should see signals logged to the console every second (check the timestamps).
Congratulations! You just built your first nio service!
Configuring blocks
Lets try changing our service by configuring the blocks to something other than the default behavior.
Click on the TestSimulator block to bring up its configuration in the right panel. Don’t worry too much about specific properties here. To get familiar though, scroll down to the Interval section and change the number in the Seconds text box from 1 to 2; click Save Block. Now select TestLogger in the execution grid and use the drop-down menu to change its Log Level and Log At to DEBUG, saving the block when you’re done.
Restart your service by clicking Stop Service and Start Service. This time you should see signals logged to the console every 2 seconds (check the timestamps).
Conclusion
Now that you’ve got a nio project with some blocks, try playing around with some of the other blocks. Change some more configuration settings on TestLogger. What does Signal Count do?. Try putting a Counter between a Simulator and a Logger. All the blocks have documentation on GitHub.
When you’re done with nio, go to the console where your logs are printing and press ctrl-c to exit nio.